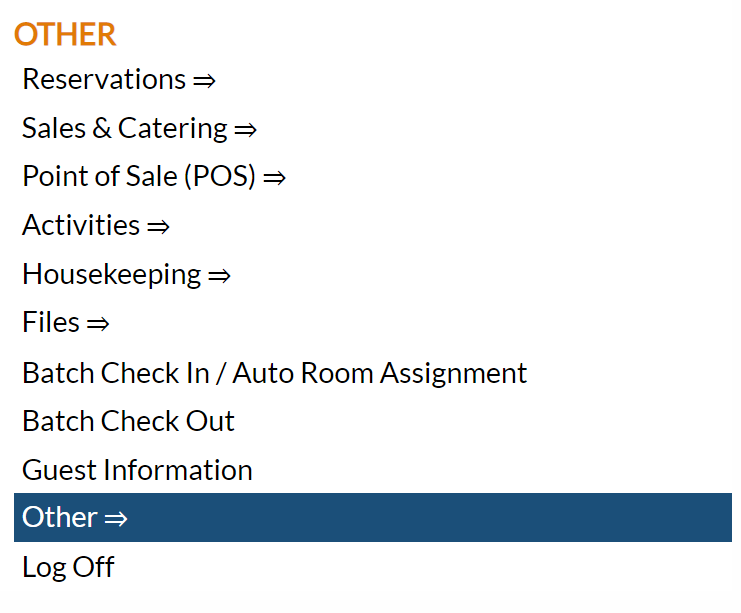
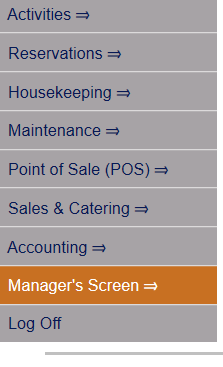
From the Full Menu => Other section, click Manager's Screen.
Click the icon on the left for the Full Menu.
This will display the Full menu in a tabular form, with four sections, Registration, Status, Cashier and Other.
Select Other from the Other section.
This will take you to the Other Front Desk Tasks Menu, which has four sections, Other List 1, Other List 2, Documents and Web.
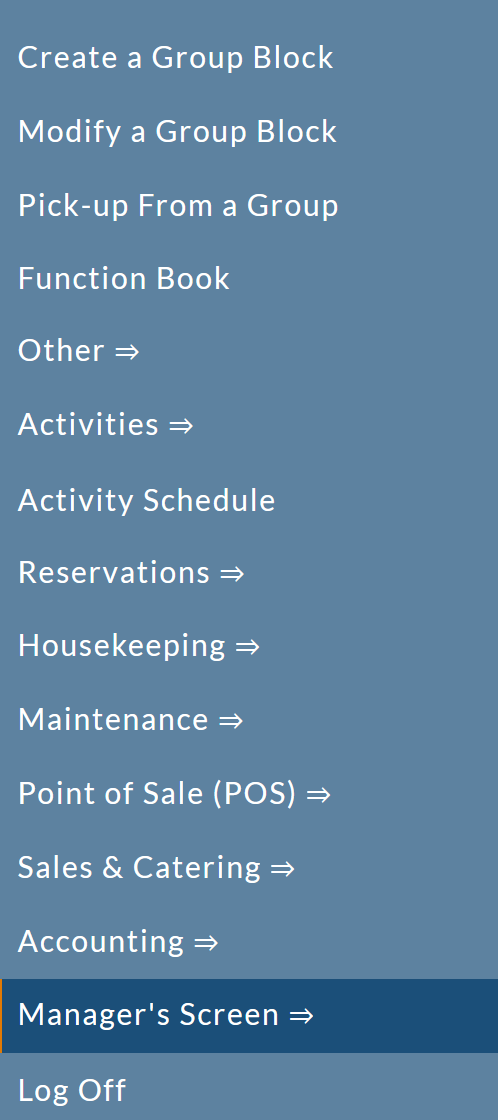
Select Manager's Screen to be taken to the Manager's Command screen.
OR:
Select Manager's Screen from the Quick Menu on the left side of the screen, to be taken to the Manager's Command screen.
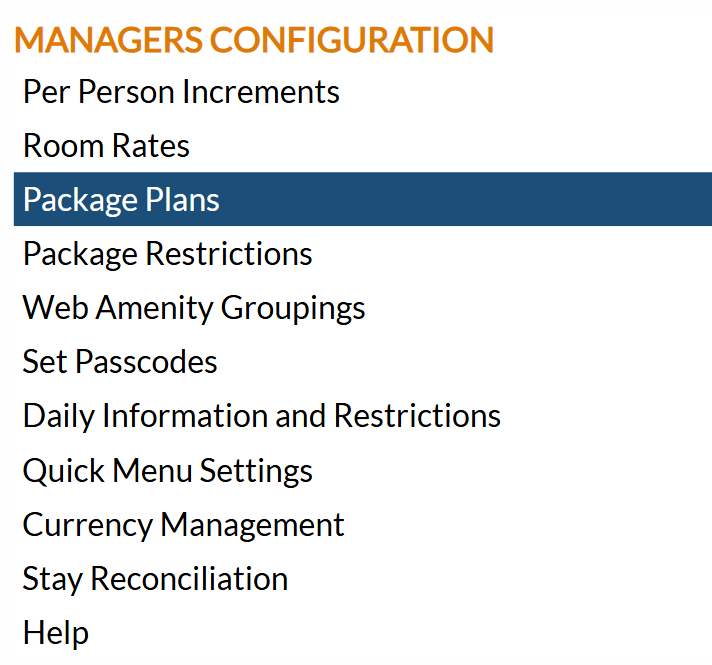
The Manager's Commands screen menu has two sections, Manager's Configuration and Manager's Maintenance.
Select Package Plans from the Manager's Configuration section.
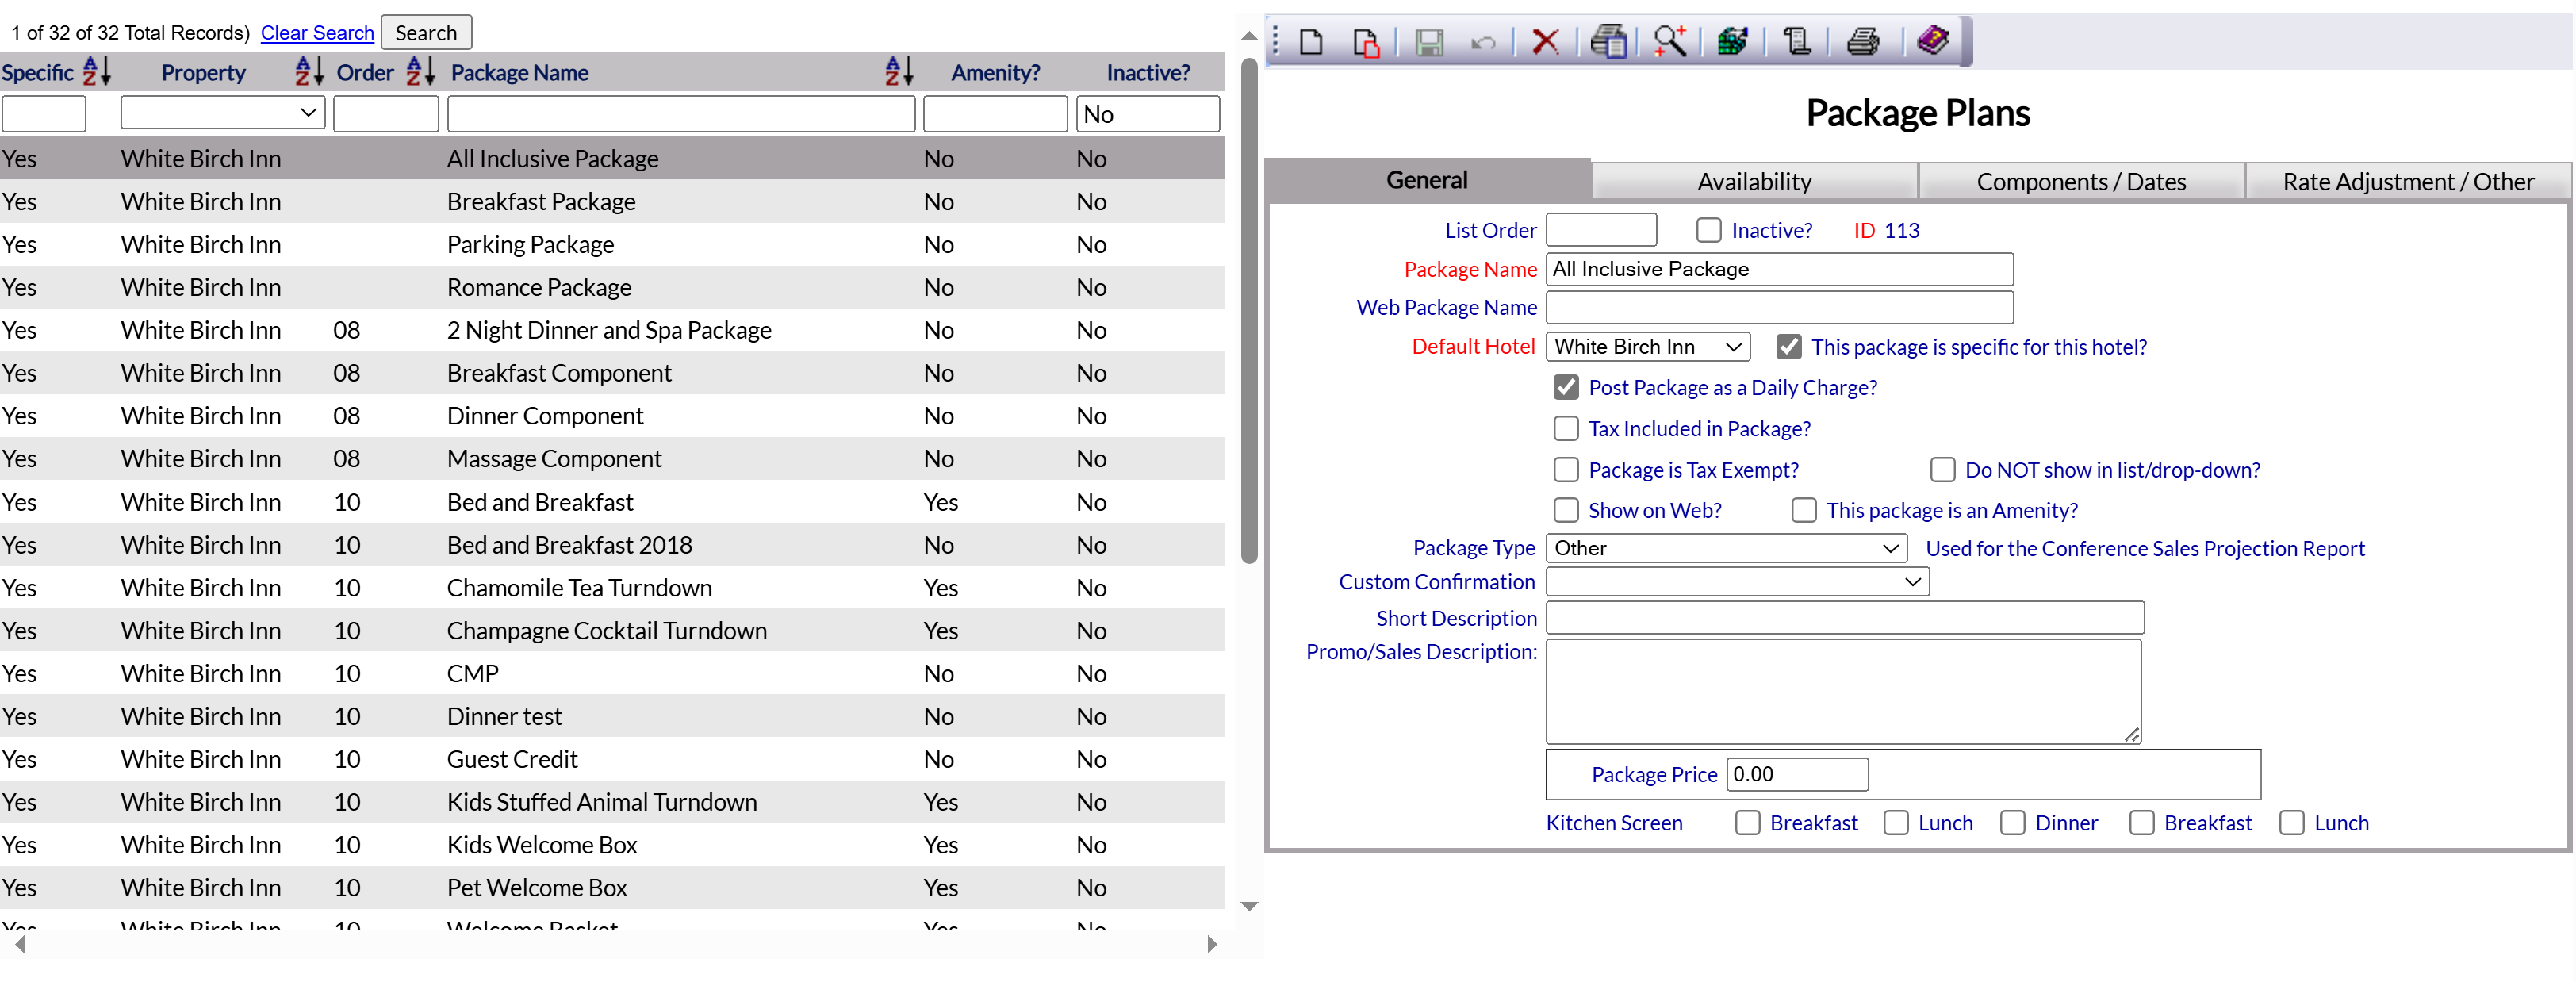
When selected, the Package Plans screen will open.
The Package Plans screen has four tabs, the General tab, which covers the general Package information including the name, the Availability tab, which allows you to limit the number of the particular Package available if desired, the Components/Dates tab for adding the particulars of the specific Package, and the Rate Adjustment/Other tab, where you can set any automatic charges for the Package Plan and add a per person adjustment for the Package if appropriate. By default the screen appears with the General tab open.
The currently configured options are displayed by:
Specific: For with multi-property users: Is this Package Plan specific to one Property? This is a Yes/No category.
Property: For with multi-property users: Shows which Property is marked as the default Property for this Package Plan.
Order: List Order of the Package Plans. If there is no list order number, the Package Plan will be displayed alphabetically.
Package Name: The name of the Package Plan.
Amenity: Is this Package Plan considered an Amenity? This is a Yes/No category.
Inactive?: This is a Yes/No category. If the Package is currently marked as inactive (and therefore unavailable), this field will say "Yes".
Selecting any Package Plan on the left will display the details on the right.
Your options include the following:
Generate a new entry:
Click the New ![]() button from the toolbar to add a new Package Plan.
button from the toolbar to add a new Package Plan.
Complete the fields described below.
OR:
Select an existing Package Plan from the list on the left, and click the Replicate ![]() button from the toolbar. Then change the field information as described below.
button from the toolbar. Then change the field information as described below.
Edit the current selection:
Change the field information described below.
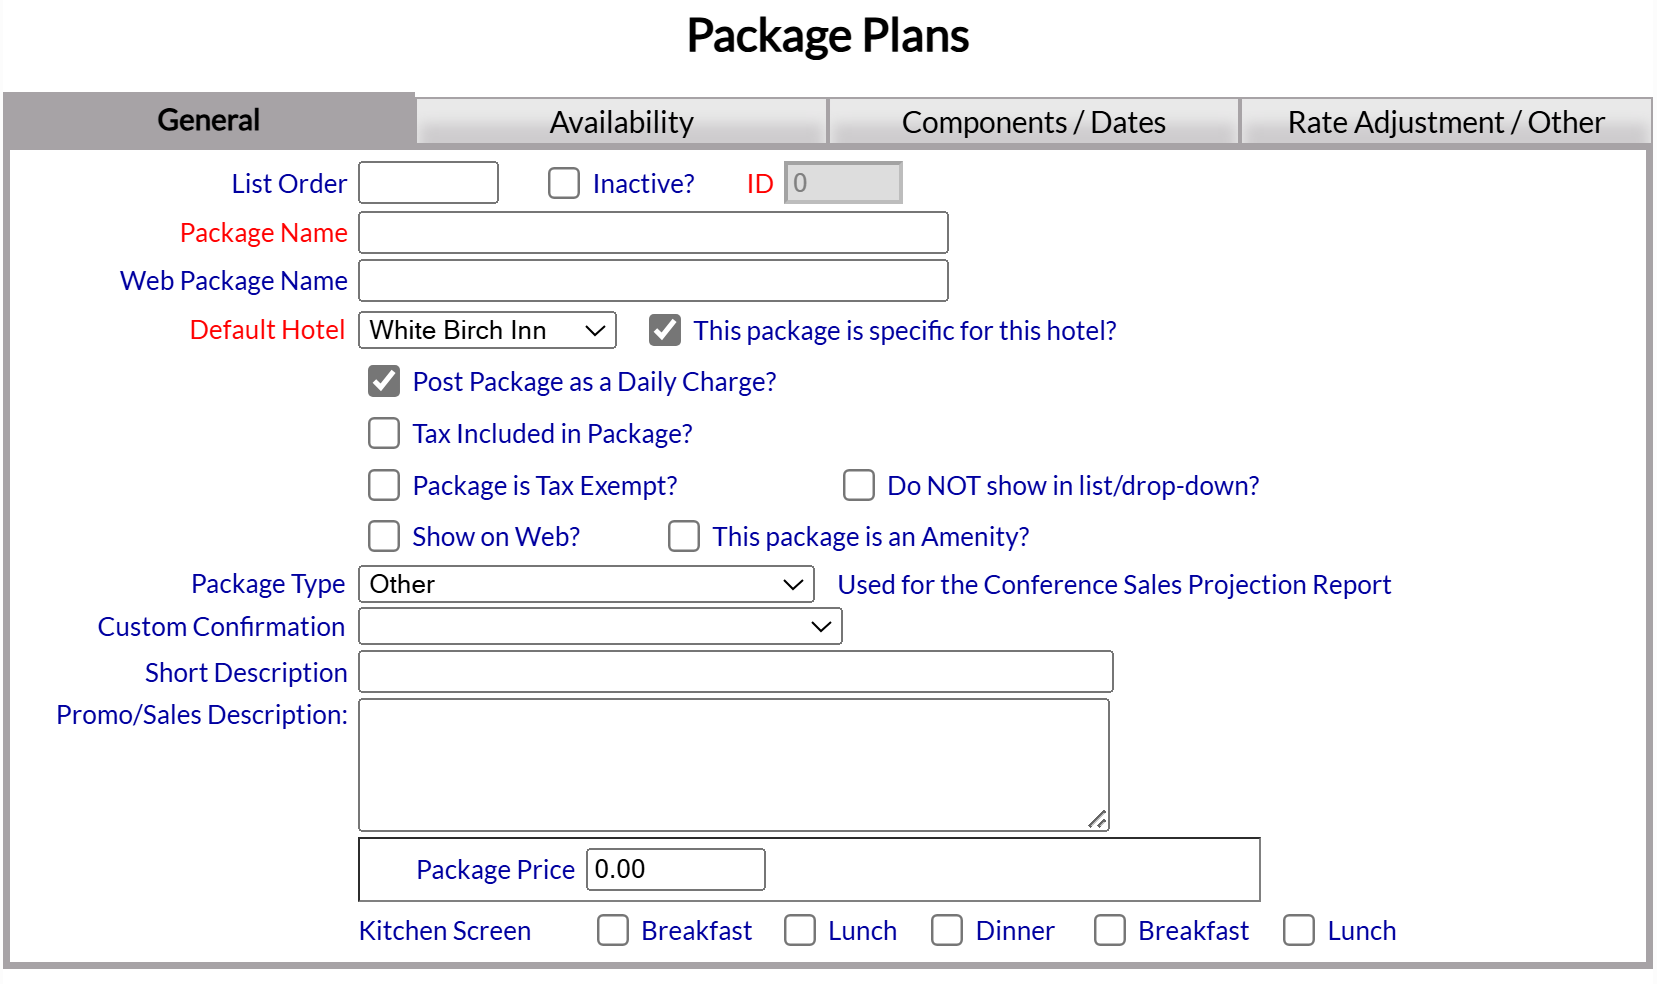
Once on the Package Plans screen, use the General tab to add or edit the basic information about the Package Plan. Use this tab to add the OVERALL TOTAL price for the Package, if there is to be a specified one (independent of the cost of the components in the package).
List Order: This is the order the Package will be displayed in the interface (on the left side of the screen).
Inactive?: Is the Package inactive? This box may be checked or unchecked. This check box will mark the package as “Not Active” and mean that the Package will not be available to select for future stays on a folio.
ID: This is a Skyware Systems assigned identifier, generated when the Package Plan is first created.
This field is required. This field is Read Only. It is a static ID generated by Skyware Systems once the Package Plan is first saved.
Package Name: Enter a name for the Package Plan. This should be short but descriptive.
This field is required. The Package Plan cannot be saved in Skyware unless it has been named.
Web Package Name: If this is to be a Web Package offer, complete this field.
Default Hotel: This is a drop-down menu of available options to select from. By default the first listed Property will be selected.
This option is required.
This package is specific for this hotel?: If the Package will only be available at the specific Property, this box should be checked. By default this box is checked. Uncheck this box if the Package Plan will be available at all Properties.
Post Package as a Daily Charge?: This box may be checked or unchecked. By default it is checked. If this box is checked, the Package will be posted as a daily charge vs a one time charge for the package.
Tax Included in Package?: If the Package charge includes any applicable taxes, check this box. By default it is not checked.
Package is Tax Exempt?: If the Package charge should not be taxed, check this box. By default it is not checked.
Do NOT show in list/drop-down?: If this box is checked, this package will not be shown as being available in any drop-down menus. By default it is not checked.
Show on Web?: Check this box if the Package is to be available for guests making reservations from the web reservations screen. By default it is not checked.
This package is an Amenity?: Check this box if the Package does NOT include the room charges for the Stay, meaning it is classed as an Amenity. By default it is not checked.
Package Type: This is a drop-down menu for you to select from. This is used for the Conference Sales Projection Report.
Custom Confirmation: A custom confirmation email may be sent for this Package Plan if wished. If so, select the document to be sent to the email associated with the guest account when this Package Plan is selected. This is a drop-down menu of all available custom confirmation options for you to select from. If the document you wish is not available you can create one. See How To Create or Customize Your Documents for more details.
Short Description: This field is available to you to enter a short description of the Package Plan, to be used in the token for the Package Plan (in the form "Amenities/Packages by Day (Short Description)") when generating custom documents.
Promo/Sales Description: This section is available for you to enter a description of the Package. Enter the descriptive information for this package (i.e. everything that the package includes, the components that make it up) that you wish potential guests to see.
Package Price: Enter the price of the OVERALL package here. If this package is being built from the top down, this field contains the total package price. The package will be charged as the entered price (the variable component price(s) will be adjusted to ensure the total package price is charged).
Kitchen Screen: Checking the box for any of the following meal time options means the package will be available/shown on the Kitchen screen at the relevant meal time:
Breakfast (Available during Breakfast for the Kitchen Screen).
Lunch (Available during Lunch for the Kitchen Screen).
Dinner (Available during Dinner for the Kitchen Screen).
Breakfast (Available during Breakfast for the Kitchen Screen - next day).
Lunch (Available during Lunch for the Kitchen Screen - next day).
The Availability tab allows you to restrict the number of the particular Package Plan available, if desired. This may be due to a limited number of specific components, such as snow mobiles or beach chairs, or a maximum capacity in a restaurant. When the number specified as available here is reached, the Package Plan will no longer be shown as available for reservation. By default the Package Plan is unlimited.
Maximum # of Packages Available per Day: Enter the maximum number of the Package Plan to be available per day here. This field is set by default to 0. 0 = UNLIMITED packages.
If you wish to change the maximum availability on specific dates, use the Start and end Date section of this tab to specify the dates and the number available between those dates. This will OVERRIDE the availability specified in the Maximum # of Packages Available per Day field. Thus you may limit or increase availability for the Package Plan in a date range separately to the general availability. (For example, you have 20 beach umbrellas available normally. The maximum number field would be entered as 20. However there is a scheduled beach closure for a week. You may use this section to specify that the Package Plan availability in that time is 0, which would override the 20 for the selected week only, before reverting back to 20 after the date has passed).
Clicking on the Add button in this section will open the Package Availability screen.
Start Date: The Date the limited Package Availability will begin. Use the drop-down menus or calendar icon to select the Start Date.
End Date: The Date the limited Package Availability will end. Use the drop-down menus or calendar icon to select the End Date.
Maximum # of Packages Available per Day: Enter the number of Packages to be available in the SPECIFIED DATE RANGE. In this case, 0 = NO packages available.
When ready, click the Save button (![]() ) in the local tool bar. The added Package Availability dates will appear in the list on the left side of the screen. Continue to add any further links until finished, then click the gray button Package in the local tool bar to return to the Package Plan screen, open to Availability tab.
) in the local tool bar. The added Package Availability dates will appear in the list on the left side of the screen. Continue to add any further links until finished, then click the gray button Package in the local tool bar to return to the Package Plan screen, open to Availability tab.
This example shows that a Package Plan that normally has unlimited availability, would now only have 15 packages available for reservation between 6-6-20 and 6-10-20, before returning to unlimited availability after 6-10-20.
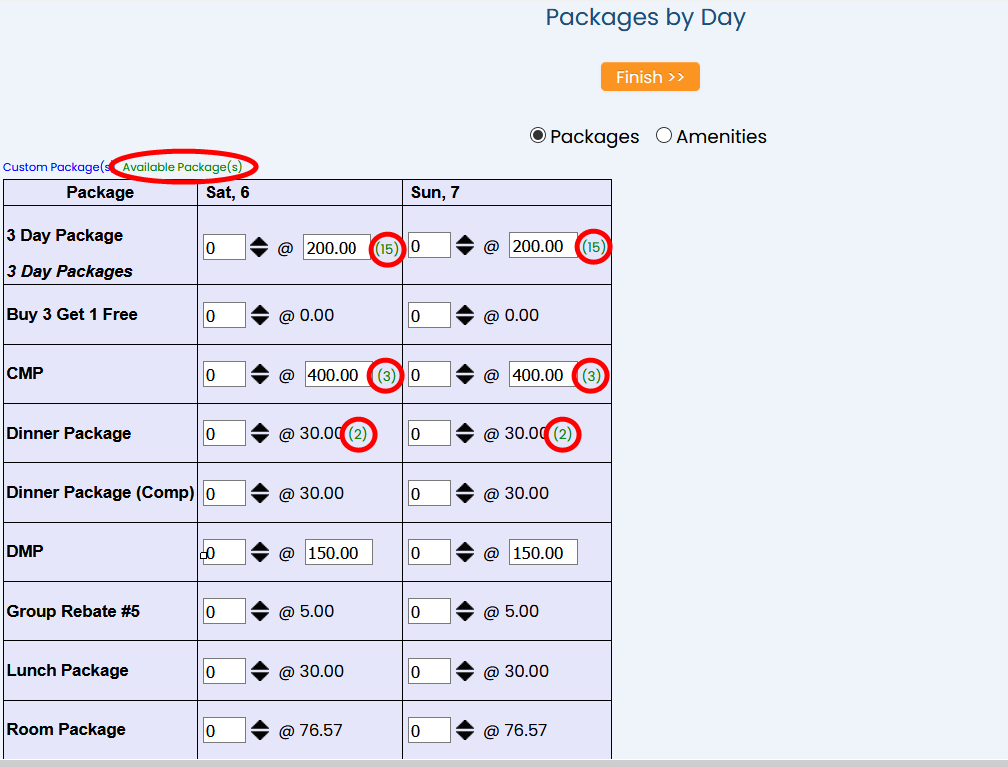
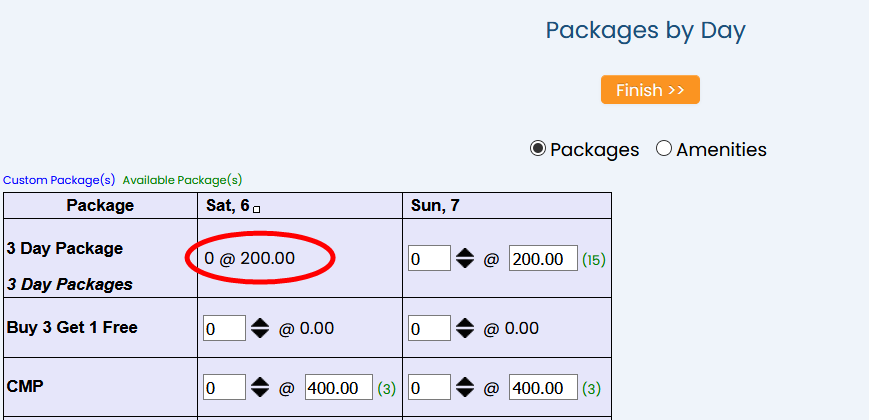
Note: If a Package Plan is designated as having limited availability, on the Packages by Day screen it will be indicated in GREEN how many are still available.
No green number in parentheses means the Package is unlimited and may be reserved as often as wanted.
Once the total available has been reached, the Package will no longer be available for selection.
Using the Components/Dates tab, generate new components or double click on existing components to modify the component price for the Package Plan.
Note: If this is a "Bottom Up" Package Plan the components will build up the total price. In a “Top Down” package the overall price set on the General tab will mean one component cost should be assigned as variable, fluctuating based on the other component prices to maintain the overall package price (typically the sleeping room component).
Click on the "Add" button in the relevant section to add or edit the individual components, links or dates that make up the package.
Clicking on the Add button in this section will open the Package Component screen.
Any Components already associated with the Package, and their price, will be displayed on the left side of the screen, with the right side containing the fields to add or edit more.
Description: This should be the name of the component.
This field is required.
Post Type: This is a drop-down menu of your available Post Types. Select one.
This field is required.
Price: Will be the default price (to the guest) for the component when selected for a package.
Cost: The cost to your property for providing this component.
Posting Type: This defines WHEN the revenue should post. Choose between "Post at the End of Day” vs. “Post at the Beginning of Day”:
An example of a “Beginning of Day” component would be a breakfast charge. A component defined as “Beginning of Day” will post on the following days’ revenue.
This field is required.
Charge Type: This defines how a charge is calculated. Choose between “by Room” vs. “Per Person”. When a component is set up to post “per room” the posting amount will be the same regardless of the number of adults/youths/children in the room. When a component is set up to post “per person” the posting amount will be the component price multiplied by the number of adults/youths/children in the room.
This field is required.
Allow Overcharge?: Allow this item to be overcharged? This box may be checked or unchecked.
If this box is checked it means that you are allowing for an overcharge of the package component WITHOUT the guest having to pay for it. If the box is not checked (not allowing an overcharge) means that the guest pays the difference.
For example if a room component for a package has been specified as $100.00 but the room cost (based on room rate and date of reservation) is actually $150.00; with "Allow Overcharge" checked, the guest only pays the $100.00 that is incorporated in the package. If Allow Overcharge is NOT checked, the guest will be charged an additional $50.00 for the room outside of the $100 accounted for in the package.
Taxes are included in the price of this component?: This box may be checked or unchecked. If the box is checked, any applicable taxes are INCLUDED in the given price of this component.
Variable Component?: This Component price changes based on the sum of all other components minus the total package price. Only one variable component allowed per package. This box may be checked or unchecked, but may be checked only for ONE component in a Package.
This check box is used with a “Top Down” package. With a “Top Down” package, the total package price is set and there is one variable priced component that will be adjusted based on the price of the other components. The Variable component’s price will change to ensure that the total package price is what was entered in the Package Price field. A Top down package requires that the total package price is entered and there is 1 variable component (typically the sleeping room component).
When you have generated a component to add to this package, click the Save button (![]() ) in the local tool bar. The added component will appear in the list on the left side of the screen. Continue to add components until finished, then click the gray button Package in the local tool bar to return to the Package Plan screen, open to Components/Dates tab.
) in the local tool bar. The added component will appear in the list on the left side of the screen. Continue to add components until finished, then click the gray button Package in the local tool bar to return to the Package Plan screen, open to Components/Dates tab.
The added Package component(s) will now be shown in the Package Components section.
To edit a component, click on the entry within the section to open the Package Component screen with the selected component details displayed on the right ready for editing.
To remove a component from the Package Plan, simply click on the red delete ("X") button to the right of the component.
Clicking on the Add button in this section will open the Package Links screen.
This screen shows any links to separate, already set up Packages. For example, a dinner component package (which might contain a meal component and a wine component) or a romance component package (with flowers, chocolates and champagne components). This means that whenever modifying a Package, instead of adding in all the individual Package components, you can add in a link to a Package which already has the separate components outlined in it. This is useful if certain components in Packages are often used together; one package is set up with all these components and then subsequent packages are linked to it, meaning the individual components do not have to be repeatedly created for every package.
Any Links already associated with the Package, and their price, will be displayed on the left side of the screen, with the right side containing the fields to add or edit more. Clicking on an entry on the left will display it on the right.
Package: Package for this Day. This is a drop-down menu of available options. Select one.
This field is required.
Nights Affected: How many nights of the Stay does this Package link affect? Select a number from the Drop-down list.
This field is required.
When ready, click the Save button (![]() ) in the local tool bar. The added Package link will appear in the list on the left side of the screen. Continue to add any further links until finished, then click the gray button Package in the local tool bar to return to the Package Plan screen, open to Components/Dates tab.
) in the local tool bar. The added Package link will appear in the list on the left side of the screen. Continue to add any further links until finished, then click the gray button Package in the local tool bar to return to the Package Plan screen, open to Components/Dates tab.
The added Package Link(s) will now be shown in the Package Links section.
To edit a Package Link entry, click on the entry within the section to open the Package Link screen with the selected package link details displayed on the right ready for editing.
To remove a package link from the Package Plan, simply click on the red delete ("X") button to the right of the package link.
Note: If no dates are selected then this package is available all the time.
This section shows the dates that the Package is available. If this section is empty, there is no restriction on the Package. You may however have seasonal Package offering, such as a golf package or tennis package , that is not available at all times.
Note: Any entries in this section OVERRIDE any entries for the Package Availability made using the Availability tab.
Clicking on the Add button in this section will open the Package Dates screen and allow you to edit the availability.
Start: The Date the Package will begin to be available. Use the drop-down menus or calendar icon to select the Start Date for this package.
End: The Date after which the Package will no be available Use the drop-down menus or calendar icon to select the End Date for this package.
Price: Price for the Package in this date range. Enter a price in this field. By default it is 0.00 (no charge).
When ready, click the Save button (![]() ) in the local tool bar. The added Package available dates will appear in the list on the left side of the screen. Continue to add any further links until finished, then click the gray button Package in the local tool bar to return to the Package Plan screen, open to Components/Dates tab.
) in the local tool bar. The added Package available dates will appear in the list on the left side of the screen. Continue to add any further links until finished, then click the gray button Package in the local tool bar to return to the Package Plan screen, open to Components/Dates tab.
The added available date(s) for the Package will now be shown in the Dates this Package is Available section. The Package will now NOT be available outside these dates.
To edit an availability date range, click on the entry within the section to open the Package Dates screen with the selected availability date range details displayed on the right ready for editing.
To remove an availability date range from the Package Plan, simply click on the red delete ("X") button to the right of the availability date range.
Note: When using the Stay Info tab to MODIFY a package for a stay, the Dates this Package is Available section can be useful to show the dates DURING THIS RESERVATION that the Package is available (for example, the specific Package may be available on the first night, or last night, only). If this section is empty, there is not restriction on the Package. For example, in a Dinner package, no Dates specified means that the guest can use the dinner package on any night they are staying. Any changes to this section through the Package screen using the Stay Info tab applies those changes ONLY FOR THAT STAY.
Use the Rate Adjustment/Other tab to set any automatic charges for the Package Plan, and add a per person adjustment for the Package if appropriate.
Note: Automatic charges may be set elsewhere within Skyware. HOWEVER, if any automatic charges are set here for this Package Plan, then this will OVERRIDE the overall automatic charges set in any other screen. This section allows you to pick and choose which packages (if any) trigger different automatic charges, and what those charges are.
Automatically Charge Room and Tax when a Reservation is Made: This box may be checked or unchecked. By default it is unchecked.
Automatically Charge 1st Nights Room and Tax When a Reservation is Made: This box may be checked or unchecked. By default it is unchecked.
If a charge for this Package Plan is to be made when a reservation is taken, that is different to either the total room and tax amount or one night room and tax amount, use ONE of the two following fields:
Automatically Charge Amount when Reservation is Made: Enter an amount in this field to charge at reservation. By default it is 0.00.
Automatically Charge Percent when Reservation is Made (ex. 10%): Enter a percentage of the total amount for room and tax in this field to charge at reservation. By default it is 0.
Use this section to add any charges for additional people being associated with the package (for example if a package includes room and breakfast for 2, an additional person included on the package may need to have an additional breakfast charge included, but not a separate room charge).
Click the Add button to open the Per Person Adjustment screen.
This screen allows you to add an additional charge based on the number of additional people in the room. You can add as many occupancy/rates as needed.
Number Of Persons: By default it will show 1. Enter the number of persons associated with the Package.
This field is required.
Room Type: This is a drop-down menu of available Room Type options. Select one or leave this field blank; if omitted then this rate will be used for all room types.
Rate: Use this field to enter the Rate adjustment amount per person.
When ready, click the Save button (![]() ) in the local tool bar. The added Per Person adjustment will appear in the list on the left side of the screen. Continue to add any further adjustments until finished, then click the gray button Package in the local tool bar to return to the Package Plan screen, open to Components/Dates tab. Click on the Rate Adjustment/Other tab to open it and view the changes in the Per Person Adjustment section.
) in the local tool bar. The added Per Person adjustment will appear in the list on the left side of the screen. Continue to add any further adjustments until finished, then click the gray button Package in the local tool bar to return to the Package Plan screen, open to Components/Dates tab. Click on the Rate Adjustment/Other tab to open it and view the changes in the Per Person Adjustment section.
In this example, now a third person, in the NSQ Room Type, will trigger an additional $20 charge on this package.
To edit a Per Person adjustment entry, click on the entry within the section to open the Per Person adjustment screen with the selected Per Person adjustment details displayed on the right ready for editing.
To remove a Per Person adjustment from the Package Plan, simply click on the red delete ("X") button to the right of the Per Person adjustment.


